هیچ دوره ای در سبد خرید شما وجود ندارد
بلوتوث در اندروید
صفحه نخست »
برنامه نویسی اندروید »
مثال های کاربری »
راه های متنوعی برای ارسال یا دریافت اطلاعات از یک دستگاه تلفن به تلفن دیگر وجود دارد. از میان تمام راه های متفاوت ، بلوتوث یکی از راه های ارسال و دریافت داده به دستگاه دیگر می باشد. پلتفرم اندروید از فریم ورک بلوتوث پشتیبانی می کند ، زیرا که بلوتوث در اندروید به دستگاه اجازه می دهد تا به طور وایرلس ، داده را با دستگاه های بلوتوثی دیگر جا به جا کند.
اندروید Bluetooth API را برای عملکرد های مختلف زیر ارائه می دهد :
- اسکن کردن (Scan) دستگاه های بلوتوث دیگر
- ارائه ی لیستی از دستگاه های جفت شده (paired devices)
- اتصال به دیگر دستگاه ها از طریق service discovery
اندروید کلاس BluetoothAdapter را ایجاد می کند تا عمل انتقال اطلاعات توسط بلوتوث را اجرایی کند .
آبجکتی از این فراخوانی را با فراخوانی متد استاتیک ()getDefaultAdapter ایجاد کنید.
سینتکس آن به قرار زیر می باشد :
private BluetoothAdapter BA;
BA = BluetoothAdapter.getDefaultAdapter();
برای اینکه بلوتوث دستگاه خود را فعال کنید ، intent را با استفاده از ثابت (constant ) بلوتوث ACTION_REQUEST_ENABLE فرا بخوانید.
سینتکس آن مانند زیر می باشد :
Intent turnOn = new Intent(BluetoothAdapter.ACTION_REQUEST_ENABLE);
startActivityForResult(turnOn, 0);
علاوه بر این ثابت (constant) ، ثابت های دیگری وجود دارند که API را ارائه می دهند که اکتیویتی های متفاوتی را پشتیبانی می کند.
لیستی از این ثابت ها را در زیر می بینید :
| شماره | ثابت و توضیحات |
| 1 | ACTION_REQUEST_DISCOVERABLE
این ثابت برای روشن کردن discovering بلوتوث استفاده می شود. |
| 2 | ACTION_STATE_CHANGED
این ثابت هشدار خواهد داد که وضعیت بلوتوث تغییر کرده است. |
| 3 | ACTION_FOUND
این ثابت برای دریافت اطلاعات در مورد دستگاه های کشف شده ی دیگر به کار می رود. |
زمانی که بلوتوث را فعال می کنید می توانید لیستی از دستگاه های جفت شده (paired devices) را با فراخوانی متد ()getBondedDevices داشته باشید.
این متد مجموعه ای از دستگاه های بلوتوث را اعلام می کند.
سینتکس آن به شرح زیر می باشد :
private Set<BluetoothDevice>pairedDevices;
pairedDevices = BA.getBondedDevices();
علاوه بر دستگاه های جفت شده (paired devices) ، متد های دیگری در API وجود دارند که کنترل بیشتری روی بلوتوث ارائه می دهند.
این متد ها در زیر ارائه شده اند :
| شماره | متد و توضیحات |
| 1 | ()enable
این متد adapter را اگر فعال نباشد، فعال می کند. |
| 2 | ()isEnabled
این متد یک متد بولین است و true را برمی گرداند اگر adapter فعال باشد. |
| 3 | ()disable
این متد adapter را غیرفعال می کند. |
| 4 | ()getName
این متد نام adapter بلوتوث را باز می گرداند. |
| 5 | (setName(String name
این متد نام بلوتوث را تغییر می دهد. |
| 6 | ()getState
این متد آخرین وضعیت adapter بلوتوث را باز می گرداند. |
| 7 | ()startDiscovery
این متد فرآیند کشف (discovery ) بلوتوث را برای مدت 120 ثانیه شروع می کند. |
مثال
این مثال توضیحاتی برای کلاس BluetoothAdapter ارائه می دهد تا بلوتوث را به کار گرفته و لیست دستگاه های جفت شده با بلوتوث را ارائه می دهد.
برای آزمایش با این مثال به یک دستگاه واقعی نیاز خواهید داشت.
| مرحله | توضیحات |
| 1 | برای ایجاد یک اپلیکیشن اندروید از Android studio استفاده نموده و آن را تحت پکیج com.example.audiocapture نام گذاری کنید. |
| 2 | فایل src/MainActivity.java را برای افزودن کد ویرایش کنید. |
| 3 | لی اوت فایل XML مربوط به res/layout/activity_main.xml را تغییر داده و اگر لازم است GUI component به آن اضافه کنید. |
| 4 | AndroidManifest.xml را تغییر دهید تا دستورات لازم را اضافه کنید. |
| 5 | برنامه را اجرا کنید و یک دستگاه اجرایی اندروید انتخاب کرده و برنامه را روی آن نصب کنید و نتایج را بررسی کنید. |
محتوای src/MainActivity.java :
package com.example.sairamkrishna.myapplication;

import android.app.Activity;
import android.bluetooth.BluetoothAdapter;
import android.bluetooth.BluetoothDevice;

import android.content.Intent;
import android.os.Bundle;
import android.view.View;

import android.widget.ArrayAdapter;
import android.widget.Button;
import android.widget.ListView;

import android.widget.Toast;
import java.util.ArrayList;
import java.util.Set;

public class MainActivity extends Activity  {
   Button b1,b2,b3,b4;
   private BluetoothAdapter BA;
   private Set<BluetoothDevice>pairedDevices;
   ListView lv;

   @Override
   protected void onCreate(Bundle savedInstanceState) {
      super.onCreate(savedInstanceState);
      setContentView(R.layout.activity_main);

      b1 = (Button) findViewById(R.id.button);
      b2=(Button)findViewById(R.id.button2);
      b3=(Button)findViewById(R.id.button3);
      b4=(Button)findViewById(R.id.button4);

      BA = BluetoothAdapter.getDefaultAdapter();
      lv = (ListView)findViewById(R.id.listView);
   }

   public void on(View v){
      if (!BA.isEnabled()) {
         Intent turnOn = new Intent(BluetoothAdapter.ACTION_REQUEST_ENABLE);
         startActivityForResult(turnOn, 0);
         Toast.makeText(getApplicationContext(), "Turned on",Toast.LENGTH_LONG).show();
      } else {
         Toast.makeText(getApplicationContext(), "Already on", Toast.LENGTH_LONG).show();
      }
   }

   public void off(View v){
      BA.disable();
      Toast.makeText(getApplicationContext(), "Turned off" ,Toast.LENGTH_LONG).show();
   }


   public  void visible(View v){
      Intent getVisible = new Intent(BluetoothAdapter.ACTION_REQUEST_DISCOVERABLE);
      startActivityForResult(getVisible, 0);
   }


   public void list(View v){
      pairedDevices = BA.getBondedDevices();

      ArrayList list = new ArrayList();

      for(BluetoothDevice bt : pairedDevices) list.add(bt.getName());
      Toast.makeText(getApplicationContext(), "Showing Paired Devices",Toast.LENGTH_SHORT).show();

      final ArrayAdapter adapter = new  ArrayAdapter(this,android.R.layout.simple_list_item_1, list);

      lv.setAdapter(adapter);
   }
}
محتوای activity_main.xml :
<?xml version="1.0" encoding="utf-8"?>
<RelativeLayout
xmlns:android="http://schemas.android.com/apk/res/android"
   xmlns:tools="http://schemas.android.com/tools"
   android:layout_width="match_parent"
   android:layout_height="match_parent"
   android:paddingLeft="@dimen/activity_horizontal_margin"
   android:paddingRight="@dimen/activity_horizontal_margin"
   android:paddingTop="@dimen/activity_vertical_margin"
   android:paddingBottom="@dimen/activity_vertical_margin"
   tools:context=".MainActivity"
   android:transitionGroup="true">

   <TextView android:text="Bluetooth Example"
      android:layout_width="wrap_content"
      android:layout_height="wrap_content"
      android:id="@+id/textview"
      android:textSize="35dp"
      android:layout_alignParentTop="true"
      android:layout_centerHorizontal="true" />

   <TextView
      android:layout_width="wrap_content"
      android:layout_height="wrap_content"
      android:text="Tutorials point"
      android:id="@+id/textView"
      android:layout_below="@+id/textview"
      android:layout_centerHorizontal="true"
      android:textColor="#ff7aff24"
      android:textSize="35dp" />

   <ImageView
      android:layout_width="wrap_content"
      android:layout_height="wrap_content"
      android:id="@+id/imageView"
      android:src="@drawable/abc"
      android:layout_below="@+id/textView"
      android:layout_centerHorizontal="true"
      android:theme="@style/Base.TextAppearance.AppCompat" />

   <Button
      android:layout_width="wrap_content"
      android:layout_height="wrap_content"
      android:text="Turn On"
      android:id="@+id/button"
      android:layout_below="@+id/imageView"
      android:layout_toStartOf="@+id/imageView"
      android:layout_toLeftOf="@+id/imageView"
      android:clickable="true"
      android:onClick="on" />

   <Button
      android:layout_width="wrap_content"
      android:layout_height="wrap_content"
      android:text="Get visible"
      android:onClick="visible"
      android:id="@+id/button2"
      android:layout_alignBottom="@+id/button"
      android:layout_centerHorizontal="true" />

   <Button
      android:layout_width="wrap_content"
      android:layout_height="wrap_content"
      android:text="List devices"
      android:onClick="list"
      android:id="@+id/button3"
      android:layout_below="@+id/imageView"
      android:layout_toRightOf="@+id/imageView"
      android:layout_toEndOf="@+id/imageView" />

   <Button
      android:layout_width="wrap_content"
      android:layout_height="wrap_content"
      android:text="turn off"
      android:onClick="off"
      android:id="@+id/button4"
      android:layout_below="@+id/button"
      android:layout_alignParentLeft="true"
      android:layout_alignParentStart="true" />

   <ListView
      android:layout_width="wrap_content"
      android:layout_height="wrap_content"
      android:id="@+id/listView"
      android:layout_alignParentBottom="true"
      android:layout_alignLeft="@+id/button"
      android:layout_alignStart="@+id/button"
      android:layout_below="@+id/textView2" />

   <TextView
      android:layout_width="wrap_content"
      android:layout_height="wrap_content"
      android:text="Paired devices:"
      android:id="@+id/textView2"
      android:textColor="#ff34ff06"
      android:textSize="25dp"
      android:layout_below="@+id/button4"
      android:layout_alignLeft="@+id/listView"
      android:layout_alignStart="@+id/listView" />

</RelativeLayout>
محتوای Strings.xml :
<resources>
   <string name="app_name">My Application</string>
</resources>
محتوای AndroidManifest.xml :
<?xml version="1.0" encoding="utf-8"?>
<manifest xmlns:android="http://schemas.android.com/apk/res/android"
   package="com.example.sairamkrishna.myapplication" >
   <uses-permission android:name="android.permission.BLUETOOTH"/>
   <uses-permission android:name="android.permission.BLUETOOTH_ADMIN"/>

   <application
      android:allowBackup="true"
      android:icon="@mipmap/ic_launcher"
      android:label="@string/app_name"
      android:theme="@style/AppTheme" >

      <activity
         android:name=".MainActivity"
         android:label="@string/app_name" >

         <intent-filter>
            <action android:name="android.intent.action.MAIN" />
            <category android:name="android.intent.category.LAUNCHER" />
         </intent-filter>

      </activity>

   </application>
</manifest>
اجازه بدهید برنامه ی AndroidCapture شما را اجرا کنیم. فرض می کنیم که دستگاه موبایل اندروید خود را به کامپیوتر متصل کرده اید. برای اجرای برنامه از Eclipse، یکی ازفایل های فعالیت پروژه را باز کرده و روی آیکن Run از تولبار کلیک کنید. قبل از شروع برنامه ی شما، Eclipse پنجره ی زیر را برای انتخاب گزینه ی محل اجرای برنامه اندرویدتان، نمایش خواهد داد.
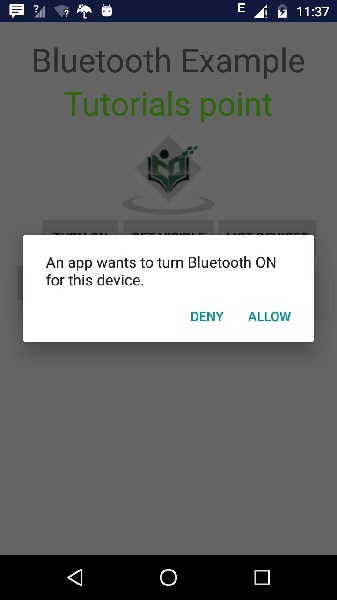
اکنون دکمه ی turn on را برای روشن کردن بلوتوث انتخاب کنید. اما به محض انتخاب آن، بلوتوث روشن نمی شود. در واقع اجازه ی شما را برای فعال شدن بلوتوث می پرسد.
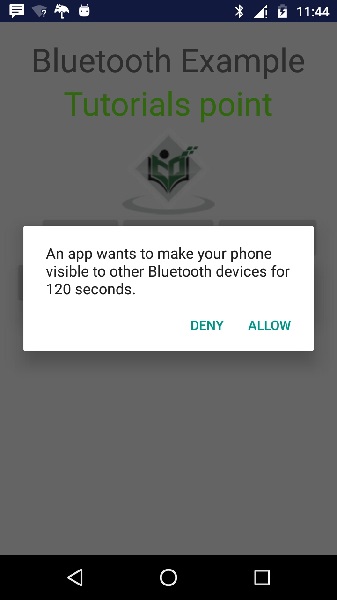
اکنون دکمه ی Get visible را انتخاب کنید تا قابلیت رویت شما روشن شود. صفحه ی زیر از شما اجازه می خواهد تا به مدت 120 ثانیه دستگاه قابل کشف باشد.
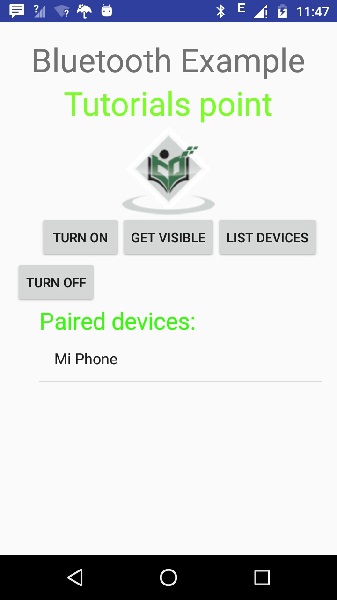
اکنون گزینه ی List Devices را انتخاب کنید. این گزینه لیست دستگاه های جفت شده را نشان می دهد. در مورد دستگاه من فقط یک دستگاه جفت شده وجود دارد که صفحه ی مربوط به آن را در زیر مشاهده می کنید.
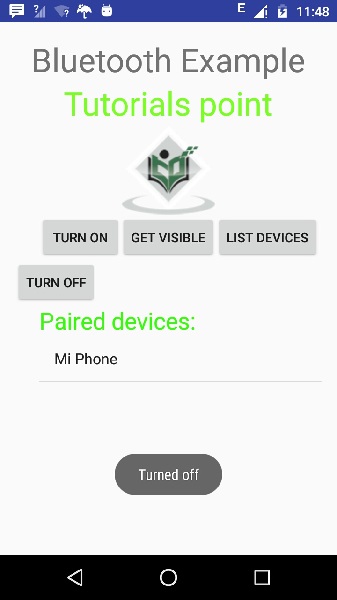
اکنون دکمه ی Turn off را برای خاموش کردن بلوتوث انتخاب کنید که پیغام زیر ظاهر خواهد شد و نشان دهنده ی خاموش شدن موفقیت آمیز بلوتوث می باشد.